How to Grow Watermelons in Pots: Easy Tips for a Big, Sweet Harvest at Home

How to Grow Watermelons in Pots: Easy Tips for a Big, Sweet Harvest at Home

Watermelons are the ultimate symbol of summer — juicy, refreshing, and full of natural sweetness. But what if you don’t have a large backyard or farmland to grow them? Here’s the good news: you can successfully grow watermelons in pots and still enjoy a heavy harvest of sweet, delicious fruits right at home!

Inspired by innovative gardeners across Asia, especially in Indonesia (where it’s known as cara menanam semangka di pot supaya berbuah lebat), container watermelon gardening has become a popular trend. It’s an efficient way to grow big fruits in small spaces, whether you live in an apartment, have a balcony garden, or just want to try something fun and productive.

In this guide, we’ll cover everything you need to know — from selecting the right pot and soil to pruning, watering, and fertilizing — so you can grow a bountiful watermelon harvest in containers without needing a large garden.


Why Grow Watermelons in Pots?

At first, the idea of growing such a sprawling fruit plant in a container might seem impossible. But with a few smart techniques, you can make it work beautifully.

Here’s why growing watermelons in pots is a great idea:

  • Space-saving: Perfect for balconies, patios, or rooftops.
  • Water-efficient: Easier to control watering and drainage.
  • Portable: You can move pots to maximize sunlight exposure.
  • Cleaner fruit: Fruits stay off the ground, reducing rot and pest problems.
  • Control: You can manage soil quality, nutrients, and pest protection better.

With the right setup, even small-space gardeners can harvest multiple sweet, full-sized melons!


Choosing the Right Watermelon Variety for Pots

Not all watermelon varieties are suitable for container growing. The best ones are compact or dwarf varieties that produce smaller but equally delicious fruits.

Here are some excellent choices:

  • Sugar Baby: A small, round variety that matures quickly and produces sweet, red flesh.
  • Golden Midget: Compact and fast-growing, perfect for containers.
  • Bush Sugar Baby: A bush-type watermelon ideal for limited spaces.
  • Mini Love: Produces 4–6 lb (2–3 kg) fruits with crisp texture.

These varieties have shorter vines and mature faster, making them ideal for container gardening.


Step-by-Step: How to Grow Watermelons in Pots

Let’s break down the process of growing watermelons in pots for a heavy harvest.


Step 1: Choose the Right Pot

Watermelons need space for their roots to spread. Choose:

  • A large pot — at least 20–25 gallons (75–100 liters) in volume.
  • Ensure the pot has drainage holes to prevent waterlogging.
  • Plastic, ceramic, or fabric grow bags all work well.

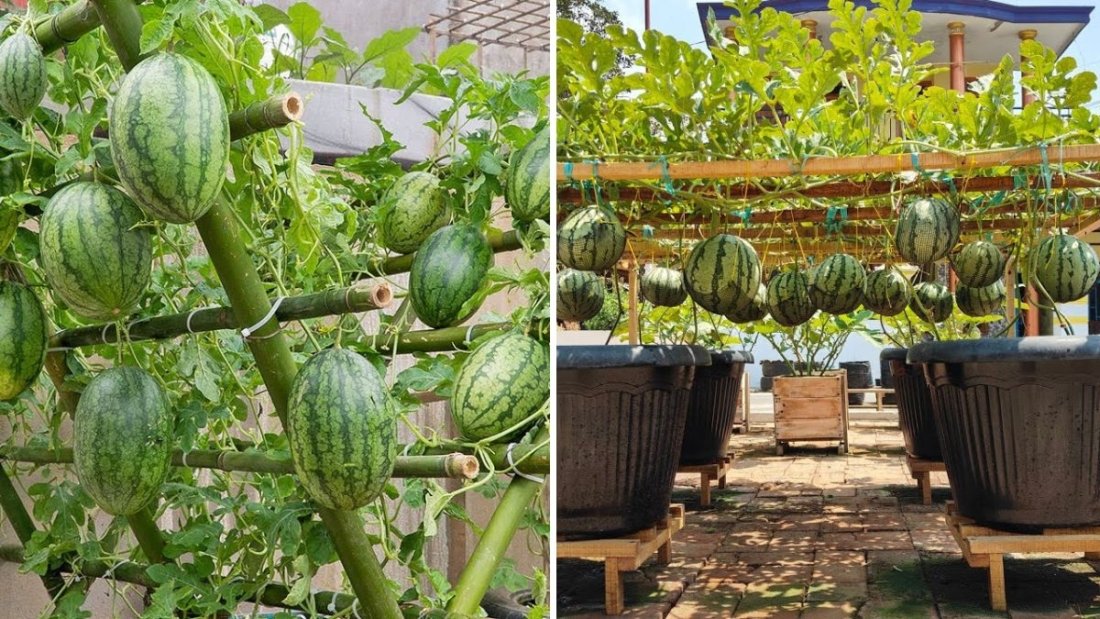
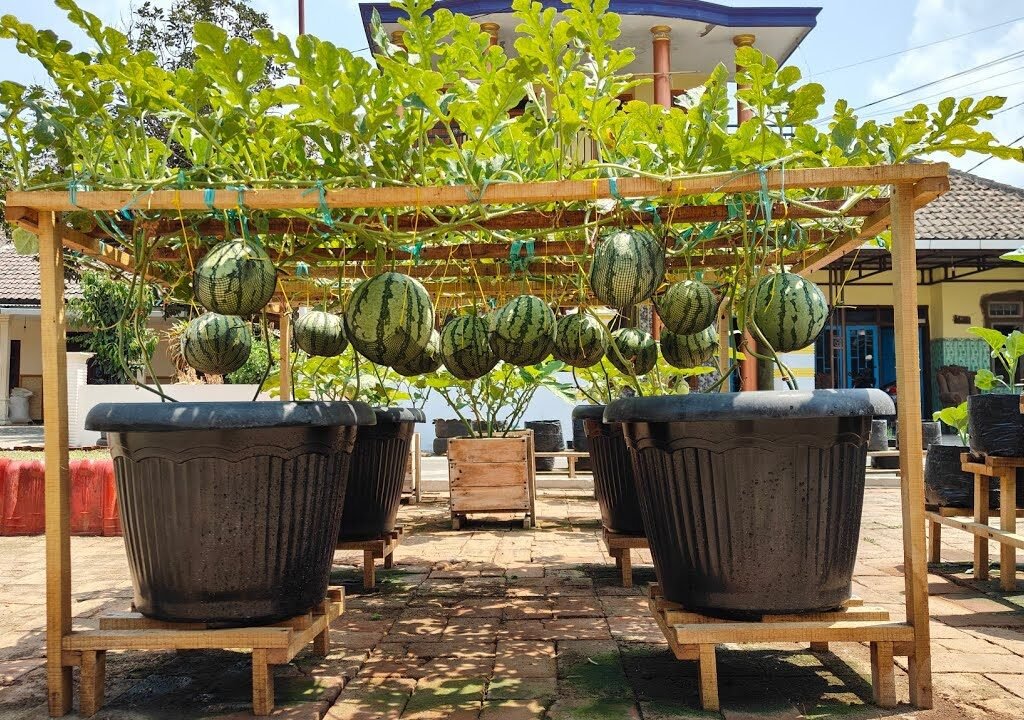
If you’re using smaller pots, stick to mini varieties and train the vines to grow vertically using a trellis.


Step 2: Prepare the Perfect Soil Mix

Watermelons love loose, well-drained, and nutrient-rich soil. Heavy clay or compacted soil will stunt growth.

Here’s a good potting mix recipe:

  • 40% garden soil
  • 40% compost or aged manure
  • 20% coco peat or perlite (for aeration)

Add a handful of bone meal or organic fertilizer to enrich the soil with phosphorus and potassium — essential nutrients for fruit development.


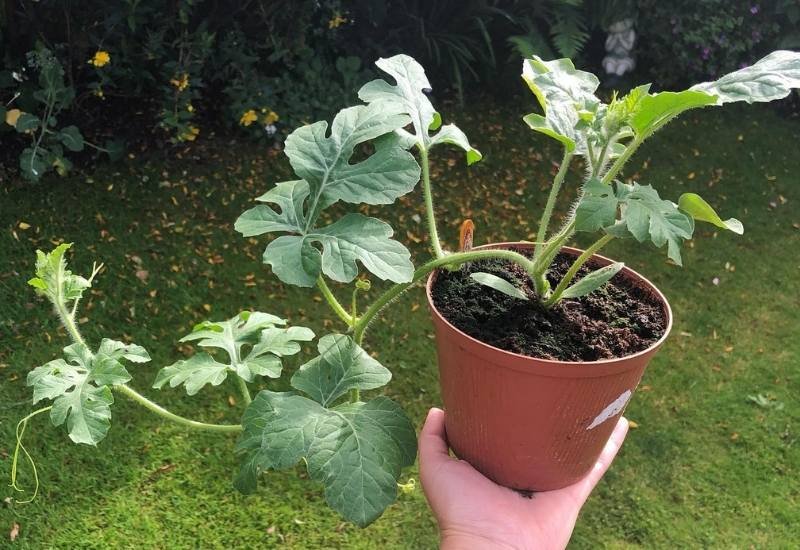
Step 3: Planting the Seeds

  • Sow 2–3 seeds per pot, about 1 inch deep.
  • Water lightly after sowing.
  • Keep the pot in a warm, sunny spot (around 25–30°C / 77–86°F).
  • Once seedlings sprout, thin them down to one strong plant per pot.

Tip: If you prefer faster results, you can start seeds indoors in small cups and transplant them when they have 2–3 true leaves.


Step 4: Sunlight Is Key

Watermelons need at least 6–8 hours of direct sunlight daily.
If you live in a cloudy region, consider using a reflective surface or repositioning your pots during the day to maximize light exposure.

Sunlight is critical for photosynthesis and sugar production — the secret to sweet, juicy melons!


Step 5: Watering Correctly

Consistent watering is crucial, but overwatering is dangerous.

  • Keep soil evenly moist, especially during flowering and fruiting.
  • Avoid watering the leaves directly; focus on the base.
  • As fruits mature, reduce watering slightly to increase sweetness.

Pro tip: Use a self-watering pot or drip system to maintain balanced moisture.


Step 6: Feeding Your Watermelon Plants

Watermelons are heavy feeders. To get lots of fruit, you must supply plenty of nutrients throughout their growth.

  • Apply organic compost or liquid fertilizer every 2–3 weeks.
  • During the vegetative stage, use nitrogen-rich fertilizer (like fish emulsion).
  • Once flowering begins, switch to a phosphorus and potassium-rich fertilizer to encourage fruiting.

Homemade options like banana peel fertilizer or compost tea work beautifully.


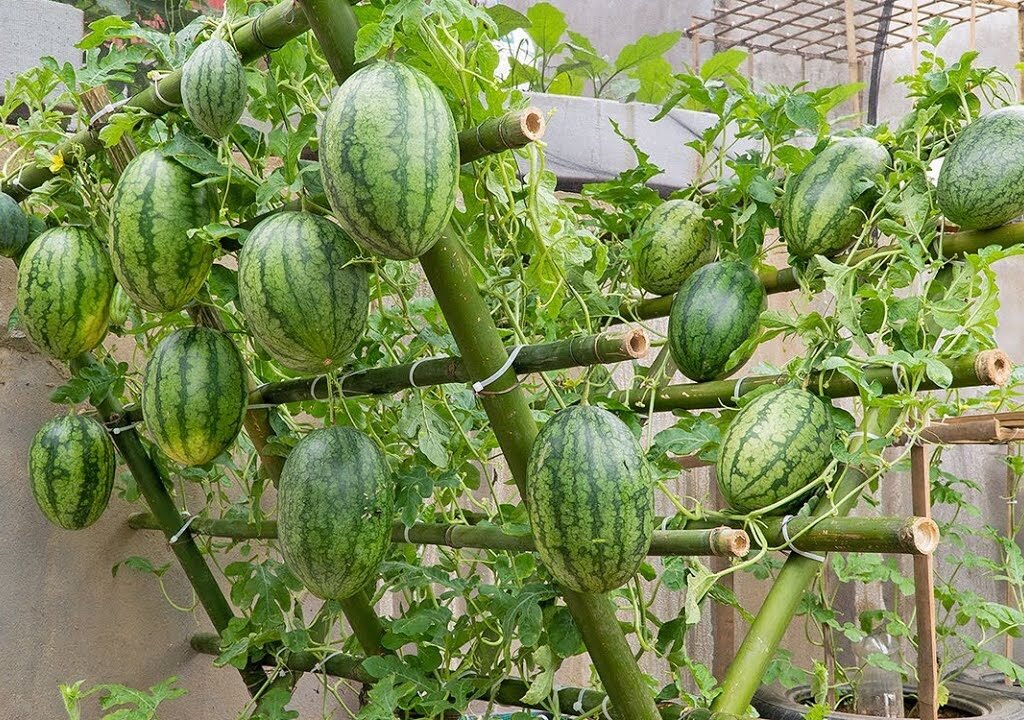
Step 7: Support and Training

Even compact watermelon vines can spread widely. If you’re short on space:

  • Use a sturdy trellis or net to train vines vertically.
  • Support developing fruits with cloth slings to prevent them from breaking off.
  • For ground-level pots, gently guide vines in circular patterns to save space.

This keeps fruits clean, prevents rotting, and improves air circulation.


Step 8: Pollination

Watermelons rely on pollination for fruit set. If you’re growing indoors or in a closed area, pollinators may be scarce.

You can hand-pollinate using a small brush:

  1. Identify male flowers (with thin stems) and female flowers (with a small fruit-shaped bulge).
  2. Transfer pollen from male to female using the brush or by directly touching them together.

Pollinate in the morning when flowers are fully open for best results.


Step 9: Pruning for Better Fruits

To ensure your watermelon plant produces large, healthy fruits:

  • Remove weak side shoots and excess foliage to direct energy to fruit growth.
  • Limit each plant to 2–3 fruits for maximum size and sweetness.

Regular pruning also improves airflow and reduces disease risks.


Step 10: Protecting from Pests and Diseases

Container-grown watermelons are generally less prone to pests, but watch out for:

  • Aphids and whiteflies: Use neem oil spray or insecticidal soap.
  • Powdery mildew: Improve ventilation and avoid overhead watering.
  • Root rot: Ensure your pot drains well and never stays waterlogged.

Planting marigolds or basil nearby can naturally repel many pests.


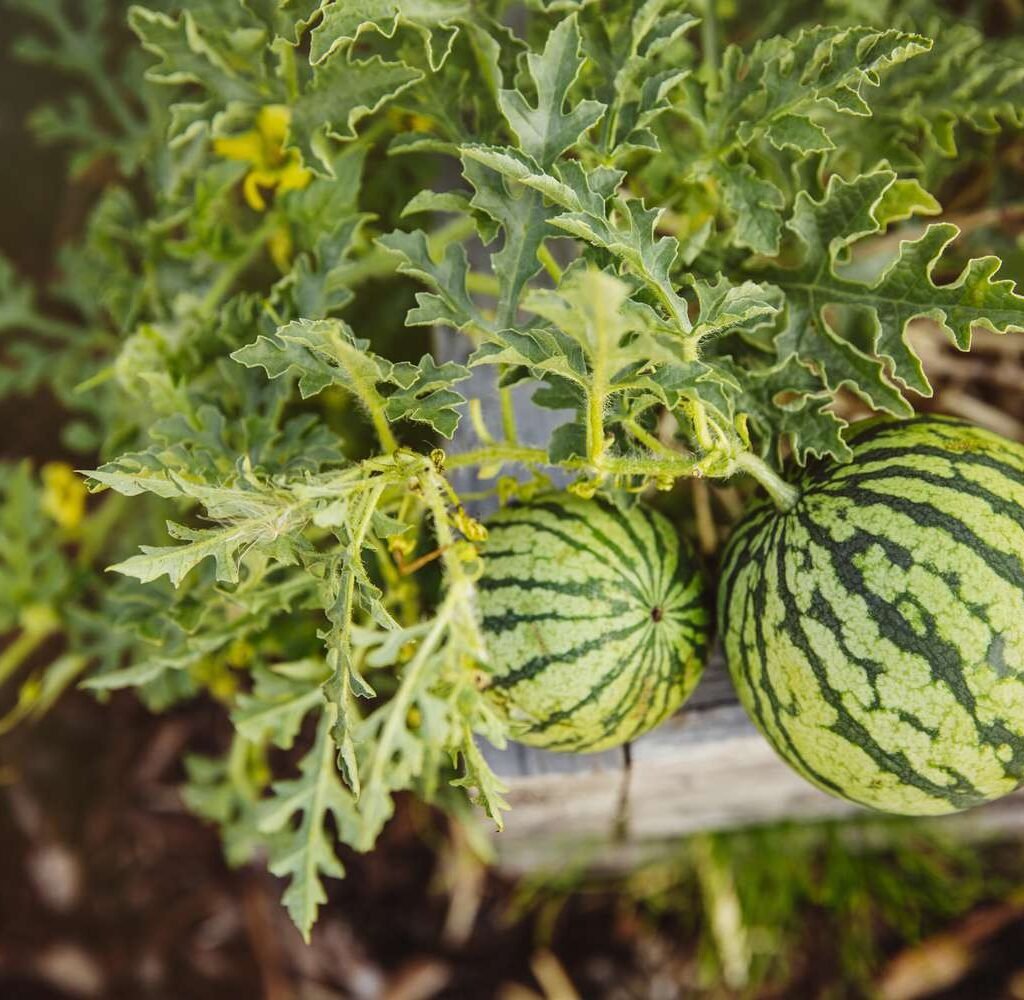
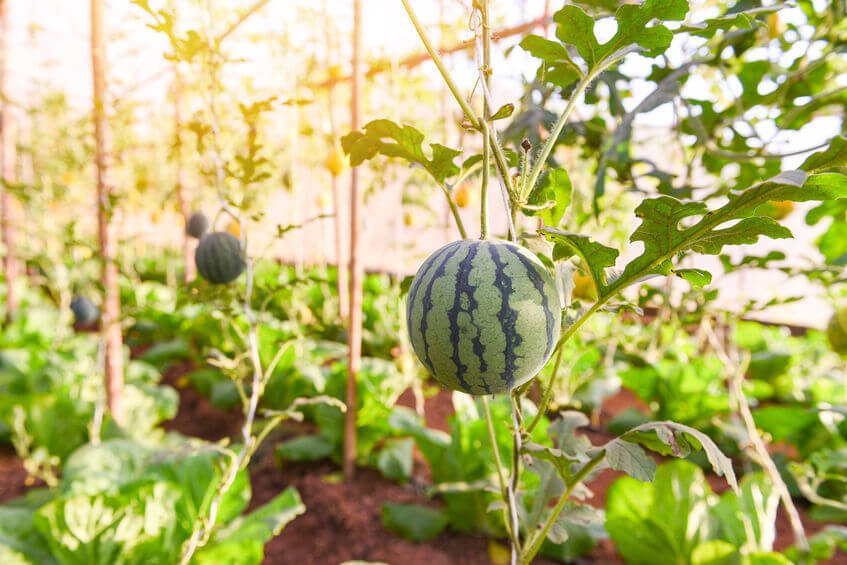
Harvesting: The Moment of Sweet Reward

Watermelons are ready to harvest 70–90 days after planting, depending on the variety. Here’s how to know when they’re perfectly ripe:

  • The tendril near the fruit stem turns brown and dries.
  • The underside of the fruit (where it touches the soil) turns creamy yellow.
  • The sound test: Tap the fruit; a deep, hollow sound means it’s ripe!

Use pruning shears to cut the melon, leaving a few inches of stem attached.


Tips for Getting a Heavier Harvest (“Berbuah Lebat”)

If your goal is to make your potted watermelon plants bear heavily, follow these expert tricks:

  1. Choose the right container size — Bigger roots = more fruit.
  2. Feed regularly with organic fertilizer during flowering and fruiting.
  3. Encourage pollination by hand or by attracting bees.
  4. Control vine growth — Don’t let vines get too long; trim to focus on fruit development.
  5. Rotate the pot occasionally to ensure all sides get sunlight.
  6. Mulch the surface to keep the roots cool and moist.

These small actions can double your fruit yield and improve sweetness significantly.


Common Problems and Solutions

ProblemCauseSolution
Fruits not formingPoor pollinationHand-pollinate flowers
Yellow leavesOverwatering or nutrient deficiencyAdjust watering; add compost
Small or tasteless fruitsToo many fruits per plantPrune to 2–3 fruits per vine
Slow growthLack of sunlightMove pot to sunnier spot

The Science Behind Growing Watermelons in Pots

Watermelons need warmth, consistent moisture, and balanced nutrients to thrive. In pots, the root zone is warmer and more controlled, which speeds up growth. However, nutrients and moisture can deplete quickly, so regular monitoring is key.

When managed carefully, container-grown melons can rival — or even surpass — those grown in open soil. Many gardeners report that potted watermelons ripen faster and taste sweeter, thanks to optimal growing conditions and precise care.


Final Thoughts: Big Fruits from Small Spaces

Growing watermelons in pots proves that you don’t need acres of farmland to enjoy fresh, homegrown fruit. With the right pot, good soil, consistent care, and a little patience, you can harvest large, sweet watermelons right from your balcony, terrace, or small yard.

It’s a satisfying project for beginners and seasoned gardeners alike — combining creativity, sustainability, and delicious results.

So, grab some pots, pick your favorite mini watermelon variety, and get planting. With a little effort and love, you’ll soon be cutting into your very own homegrown watermelon — proof that even the biggest fruits can come from the smallest spaces.

How to Grow Tomatoes Using the Intercropping Method

How to Grow Tomatoes Using the Intercropping Method

Growing tomatoes is one of the most rewarding experiences for gardeners. Whether you’re tending a backyard plot or a small balcony garden, tomatoes reward your care with vibrant color and delicious flavor. But did you know there’s a way to make your tomato garden even more productive and eco-friendly?

The intercropping method, also known as companion planting, is a smart agricultural technique that allows you to grow tomatoes alongside other plants for mutual benefit. Popular among Indonesian farmers and gardeners (known locally as metode tumpang sari), this method helps boost yield, improve soil health, reduce pests, and make the best use of space.

In this detailed guide, we’ll explore how to plant tomatoes using the intercropping method, step by step. You’ll learn which plants grow best with tomatoes, how to manage spacing, and how this scientific yet simple approach can transform your garden into a thriving ecosystem.


What Is Intercropping (Tumpang Sari)?

Intercropping is the practice of growing two or more crops in close proximity to each other. Instead of planting a single type of plant in a large area (monocropping), intercropping mimics natural ecosystems where different species coexist and support one another.

In Indonesia, tumpang sari has been practiced for generations, combining vegetables, herbs, and legumes in one plot to make the most out of limited space and natural resources.

When done right, intercropping helps create balance — plants with different root systems, nutrient needs, and growth habits complement each other rather than compete.


Why Tomatoes Are Perfect for Intercropping

Tomatoes are one of the best crops to use in intercropping systems because they:

  • Have a moderate root depth, allowing shallow-rooted plants to grow alongside them.
  • Provide partial shade for smaller crops that prefer cooler conditions.
  • Thrive in nutrient-rich but well-drained soil, compatible with many companion vegetables and herbs.
  • Benefit from neighboring plants that repel pests or improve soil nitrogen.

In essence, tomatoes are social plants — they grow better when surrounded by the right companions!


Benefits of Intercropping Tomatoes

Let’s look at why more and more farmers and home gardeners are choosing this method:

1. Higher Productivity

Instead of using your garden space for just one crop, intercropping allows you to grow multiple crops at once. This means higher overall yield per square meter.

For instance, you can plant tomatoes with onions, lettuce, or beans — and harvest all three during the same growing season.

2. Improved Soil Fertility

Certain plants, like legumes (beans and peas), fix nitrogen from the air into the soil. This provides essential nutrients for tomatoes naturally, reducing the need for chemical fertilizers.

3. Pest and Disease Control

Companion plants can repel harmful insects and attract beneficial ones. For example, basil and marigold release scents that deter tomato hornworms and aphids.

4. Better Moisture and Weed Management

When crops cover the soil surface effectively, they reduce evaporation and suppress weed growth. This helps maintain soil moisture and reduces the need for frequent watering.

5. Eco-Friendly and Sustainable

By reducing chemical inputs and promoting biodiversity, intercropping supports a healthier, more balanced ecosystem — a perfect example of nature and science working together.


Best Companion Plants for Tomatoes

Not all plants make good companions for tomatoes. Choosing the right partners can make a big difference. Here are some of the best matches:

Basil

One of the most famous companions for tomatoes. Basil enhances tomato flavor and repels insects like aphids and whiteflies.

Onions and Garlic

These alliums repel many pests, including caterpillars and nematodes, which can damage tomato roots.

Carrots

Carrots help loosen the soil, allowing tomato roots to breathe and grow deeper.

Lettuce and Spinach

These leafy greens grow quickly and thrive in the shade of taller tomato plants. Perfect for maximizing space.

Corn

In traditional tumpang sari, corn is used to provide partial shade and support for climbing plants, including tomatoes and beans.

Beans and Peas

As legumes, they enrich the soil with nitrogen, helping tomatoes grow stronger and healthier.

Marigold and Nasturtium

Their strong scent repels nematodes and attracts pollinators, keeping your tomato patch healthy and active.


Plants to Avoid Growing Near Tomatoes

Just as some plants are beneficial, others can harm tomato growth. Avoid intercropping tomatoes with:

  • Cabbage family (broccoli, cauliflower, kale): They compete heavily for nutrients.
  • Fennel: Releases chemicals that inhibit tomato growth.
  • Potatoes: Attract the same pests and diseases as tomatoes, increasing risk of infection.

How to Plant Tomatoes Using the Intercropping Method

Here’s a step-by-step guide to setting up your tumpang sari tomato garden:

Step 1: Choose the Right Location

Tomatoes need at least 6–8 hours of sunlight daily. Choose a well-drained spot where water doesn’t pool after rain.

Step 2: Prepare the Soil

  • Mix garden soil with compost or organic manure.
  • Ensure the pH is between 6.0 and 6.8 for optimal nutrient absorption.
  • Loosen the soil at least 12 inches deep to allow proper root development.

Step 3: Plan the Layout

Design your garden rows or beds strategically:

  • Plant tomatoes in the center or main row.
  • Add shorter plants (lettuce, spinach) between tomato rows.
  • Plant aromatic herbs (basil, marigold) along the borders to repel pests.
  • Include beans or peas near the edges to fix nitrogen in the soil.

Step 4: Spacing

  • Space tomato plants 18–24 inches apart to ensure good air circulation.
  • For smaller crops like lettuce, leave 6–8 inches between plants.

Step 5: Watering and Mulching

Tomatoes need consistent moisture but dislike soggy roots. Use drip irrigation or deep watering every few days, depending on weather.
Mulch with straw or dry leaves to keep soil moist and prevent weeds.

Step 6: Fertilizing

Since companion plants like beans and basil add nutrients naturally, you’ll need less fertilizer overall. Use organic compost or liquid seaweed monthly for balanced nutrition.

Step 7: Pruning and Maintenance

Remove lower tomato leaves that touch the ground to prevent disease.
Harvest companion crops like lettuce early to give tomatoes more room as they mature.

Step 8: Harvesting

Tomatoes are ready when they turn fully red (or the color of your chosen variety) and feel slightly soft. Regular harvesting encourages continuous production.


Example of a Productive Intercropping System

Here’s a sample setup for a 1-square-meter garden bed:

CropPositionPurpose
TomatoCenter rowMain crop, fruit producer
BasilAlong sidesPest control and flavor enhancer
LettuceBetween tomato plantsFast-growing, shade-tolerant
BeansOuter borderNitrogen fixer
MarigoldCornersPest deterrent, pollinator attractor

This system ensures you’re utilizing every inch of your garden efficiently while maintaining healthy soil and biodiversity.


Common Mistakes to Avoid in Tomato Intercropping

Even though tumpang sari is beginner-friendly, avoid these pitfalls:

  1. Overcrowding plants: Leads to poor air circulation and higher disease risk.
  2. Ignoring crop compatibility: Some plants compete rather than cooperate.
  3. Neglecting soil fertility: Even with intercropping, add organic matter regularly.
  4. Watering unevenly: Uneven moisture can cause fruit cracking or blossom-end rot.

Scientific Backing: Why Intercropping Works

Research in sustainable agriculture supports intercropping as one of the most efficient and eco-friendly cultivation methods. Studies from the Korean and Indonesian Agricultural Institutes show that intercropped tomato systems can increase yield by up to 30% while reducing pest infestation by 40%.

By combining crops with different nutrient demands and growth habits, the system maintains natural soil fertility and reduces the buildup of pests that usually attack monocultures.


Sustainability and Long-Term Benefits

Practicing intercropping goes beyond short-term productivity — it builds long-term soil health. Over time, this method:

  • Increases microbial activity in the soil.
  • Prevents nutrient depletion and erosion.
  • Supports pollinators and beneficial insects.
  • Creates a self-sustaining ecosystem where every plant has a role.

For home gardeners, this means less dependence on chemical fertilizers and pesticides, and for small-scale farmers, it means higher yields with lower costs.


Conclusion: A Smarter Way to Grow Tomatoes

Growing tomatoes using the intercropping (tumpang sari) method is more than a gardening trick — it’s a holistic approach to sustainable farming. By blending nature’s diversity with simple scientific principles, you can create a thriving mini-ecosystem right in your garden.

Whether you pair tomatoes with basil for better flavor, beans for natural fertilization, or marigolds for pest control, every companion plant adds value.

So, the next time you plan your tomato patch, think teamwork. Your garden will thank you — with richer soil, healthier plants, and baskets full of vibrant, homegrown tomatoes.

Farming Is Science: How Korean Scientists Are Revolutionizing Fresh Vegetable Production

Farming Is Science: How Korean Scientists Are Revolutionizing Fresh Vegetable Production

Modern farming is no longer just about tilling the soil and waiting for the rains — it’s a science, an intricate balance of technology, biology, and innovation. Around the world, scientists are transforming agriculture into a precise, efficient, and sustainable process. Nowhere is this more evident than in South Korea, where researchers and agricultural technologists are redefining the future of food production.

This article explores how Korean scientists are using advanced techniques to grow fresh vegetables in controlled environments — with cleaner methods, faster yields, and higher nutritional value than ever before. If you’ve ever wondered how science is shaping the farms of tomorrow, this deep dive will open your eyes to a fascinating new world where farming and technology merge seamlessly.


The Evolution of Farming into a Science

For centuries, farming relied on experience, intuition, and weather patterns. Today, it’s backed by data, technology, and scientific precision. Korean agricultural research institutions and startups are leading this movement, turning farms into laboratories where every stage — from seed germination to harvest — is measured, optimized, and improved.

The result? Cleaner, healthier vegetables grown using less land, less water, and fewer chemical inputs — all while maintaining consistent quality year-round.


The Science Behind Modern Korean Farming

At the heart of this transformation lies a blend of scientific disciplines — biology, chemistry, engineering, and computer science. Let’s break down the main processes Korean scientists use to grow vegetables efficiently and sustainably.

1. Hydroponic Farming Systems

Hydroponics is a soil-free farming method where plants grow in nutrient-rich water solutions. Instead of relying on unpredictable soil conditions, Korean scientists use controlled hydroponic systems to give plants exactly what they need, when they need it.

In research facilities and smart greenhouses across South Korea, vegetables like lettuce, spinach, kale, and herbs grow in vertical racks or floating trays. Sensors monitor nutrient levels, pH, and water temperature continuously, ensuring that each plant receives the perfect environment for rapid growth.

Benefits:

  • 90% less water than traditional farming
  • No soil-borne diseases
  • Faster growth and more harvests per year
  • Pesticide-free produce

Hydroponics is especially valuable in urban areas or regions with limited farmland, helping cities like Seoul grow their own food locally and sustainably.


2. Smart Greenhouses with Climate Control

Another major breakthrough in Korean farming is the smart greenhouse — a completely automated environment controlled by sensors, computers, and AI algorithms.

In these facilities, temperature, humidity, and light intensity are precisely regulated. When sunlight is insufficient, LED grow lights provide the exact wavelengths needed for photosynthesis. When humidity rises, ventilation systems automatically adjust.

Farmers no longer guess when to water or fertilize; sensors and AI systems make those decisions based on real-time plant data.

Result: Healthier plants, predictable harvests, and vegetables that grow even in extreme weather conditions.


3. Aquaponics – The Natural Synergy Between Fish and Plants

Korean scientists also experiment with aquaponics, an advanced farming method that combines aquaculture (raising fish) with hydroponics (growing plants).

Here’s how it works:

  • Fish produce waste rich in ammonia.
  • Beneficial bacteria convert this ammonia into nitrates, a natural fertilizer.
  • The water containing these nutrients is circulated to the vegetable beds, feeding the plants.
  • The plants, in turn, purify the water, which returns clean to the fish tanks.

This closed-loop system is sustainable, organic, and highly efficient. Korean farms use it to grow leafy greens, herbs, and even fruiting crops like tomatoes while simultaneously raising fish such as tilapia or carp.

Benefits:

  • Zero chemical fertilizer or pesticides
  • Efficient recycling of nutrients
  • Minimal water waste

4. Vertical Farming – Maximizing Space, Minimizing Footprint

With limited land available in many Korean cities, vertical farming has become a symbol of innovation. By stacking growing layers vertically under LED lights, scientists can produce ten times more vegetables per square meter compared to traditional methods.

These vertical farms are housed in warehouses, basements, and even high-rise buildings. Inside, every environmental factor is controlled — light spectrum, airflow, temperature, and nutrient supply — allowing vegetables to grow 365 days a year without being affected by seasons.

This model is key to urban agriculture, ensuring fresh food is produced close to consumers, reducing transportation emissions and post-harvest losses.


The Role of Data and Artificial Intelligence in Farming

Modern Korean farms collect enormous amounts of data daily — from soil moisture and nutrient levels to plant growth rates and leaf color. Artificial intelligence (AI) analyzes this data, detecting subtle patterns humans might miss.

For example:

  • AI can predict the ideal harvest date based on real-time growth data.
  • Machine learning algorithms adjust nutrient mixes depending on plant stage.
  • Automated robots handle seeding, transplanting, and harvesting.

This data-driven approach reduces human error and increases productivity, allowing farmers to focus on improving sustainability and crop quality.


Biotechnology and Genetic Research in Vegetable Production

Korean scientists are also using biotechnology to develop more resilient vegetable varieties. Through genetic selection and research (not necessarily genetic modification), they identify plants that naturally resist pests, tolerate temperature fluctuations, and produce higher yields.

For instance, certain lettuce and spinach cultivars bred in Korea can thrive in cooler indoor environments without losing flavor or texture. These innovations ensure reliable food production regardless of external climate changes — a crucial advantage in the era of global warming.


Sustainability and Eco-Friendly Goals

Science-driven farming is not just about productivity — it’s about protecting the planet. Korean agricultural research prioritizes:

  • Water conservation: Systems recycle up to 95% of water.
  • Energy efficiency: LED lights and renewable energy sources power indoor farms.
  • Zero pesticide use: Biological pest control replaces chemicals.
  • Waste reduction: Plant residues are composted or turned into biofertilizer.

These practices ensure that farming remains eco-friendly, even as demand for fresh vegetables increases.


Real-World Examples of Korean Scientific Farming

Across South Korea, several groundbreaking facilities are showcasing the future of agriculture:

  • National Institute of Agricultural Sciences (NAS): Conducts research on smart hydroponics, robotic harvesting, and nutrient optimization.
  • Seoul Smart Farm Center: Demonstrates vertical farming techniques for urban environments.
  • Jeju Agricultural Technology Park: Uses aquaponics and greenhouse systems to grow tropical and temperate vegetables year-round.

These sites serve as learning hubs for farmers and students, helping spread scientific farming knowledge to the next generation.


From Laboratory to Table: The Freshness Advantage

Vegetables grown using scientific farming methods reach consumers faster and fresher. Since most are grown locally — even within cities — the time between harvest and table can be just a few hours.

Consumers benefit from:

  • Fresher, crisper produce with better taste and nutrition.
  • Cleaner vegetables, free from pesticides and chemical residues.
  • Transparent sourcing, as each crop’s growing conditions are recorded digitally.

This creates a new level of trust between growers and consumers, something traditional large-scale agriculture often lacks.


Challenges and Future Directions

Despite the success of scientific farming, challenges remain. High initial setup costs, energy use for lighting, and limited scalability in some regions are hurdles scientists continue to address.

However, ongoing research is solving these issues rapidly. Solar-powered farms, more efficient LED systems, and AI-driven resource management are making high-tech farming increasingly accessible.

The next frontier is community-level smart farms — small, modular systems that households or local cooperatives can use to grow their own food year-round.


Conclusion: Farming as a Living Science

The phrase “farming is science” perfectly captures what’s happening in South Korea today. What was once manual labor is now a precise, data-backed process — a fusion of biology, engineering, and innovation.

By mastering controlled environments, nutrient science, and smart technology, Korean scientists are proving that sustainable food production can be achieved anywhere — even in urban settings or regions with poor soil.

The vision is clear: a future where everyone has access to fresh, healthy vegetables grown locally and sustainably, powered not by luck or weather, but by knowledge, innovation, and the science of farming.

The Secret Watering Method That Keeps Eggplants Fruiting All Year Long

The Secret Watering Method That Keeps Eggplants Fruiting All Year Long

Growing eggplants can be deeply satisfying — those glossy purple fruits not only look stunning in the garden but also make for delicious meals. However, many gardeners struggle to keep their eggplant plants productive throughout the year. The good news? With the right watering technique, you can enjoy continuous harvests without having to replant every season.

This guide explores a clever and sustainable watering method that keeps eggplants healthy, vigorous, and fruiting year-round. Inspired by innovative farmers, this approach can be done right at home — no fancy equipment or large plots required. Let’s dive into how you can replicate it and transform your eggplant garden into a nonstop producer.


Understanding the Needs of Eggplants

Before getting into the special watering method, it’s essential to understand what eggplants love. These heat-loving vegetables thrive in warm weather, plenty of sunlight, and well-drained, nutrient-rich soil.

However, the real key to success lies in consistent moisture. Eggplants don’t like extremes — too little water causes flowers to drop, while overwatering leads to root rot. The trick is finding the perfect balance: keeping the soil evenly moist without being soggy.

That’s where this innovative watering method comes in.


The Smart Watering Concept

Traditional surface watering often leads to uneven moisture — water quickly evaporates, and the deeper roots remain thirsty. The method used by experienced farmers involves deep and controlled watering, delivering moisture directly to the root zone.

Here’s the idea: instead of flooding the soil from above, you create a sub-surface watering system that supplies water gradually, keeping roots hydrated and strong. This not only reduces water waste but also encourages eggplants to develop deep, sturdy root systems that support year-round growth.


How to Set Up the Continuous Watering System

You can easily replicate this method at home with a few simple materials.

What You’ll Need:

  • Large containers, grow bags, or garden beds
  • A few plastic bottles or PVC pipes
  • Organic compost or manure
  • Quality soil mix
  • Mulch (straw, dry leaves, or coco peat)

Step 1: Prepare the Soil

Mix garden soil with compost or organic manure to ensure it’s rich in nutrients. Eggplants are heavy feeders and benefit from nutrient-dense soil that supports continuous flowering and fruiting.

Step 2: Create a Subsurface Watering Tube

Take a plastic bottle or PVC pipe about 1 to 2 inches wide and 8–10 inches long. Drill several small holes on the sides and bottom of the pipe or bottle.

Place this tube vertically in the planting area, ensuring that the perforated section sits below the root zone while the top remains above the soil surface.

When you pour water into the tube, it seeps slowly and directly to the roots — no evaporation, no water waste, and no surface compaction.

Step 3: Plant Your Eggplants

Plant your eggplant seedlings around the watering tube, spacing them about 18–24 inches apart. Water each planting hole lightly to help the seedlings settle.

Step 4: Add Mulch

Cover the soil surface with organic mulch. This locks in moisture, keeps the soil temperature stable, and prevents weeds.

Step 5: Water Efficiently

Pour water into the tube every few days, depending on the weather. The deep watering encourages strong root development, while the mulch prevents rapid evaporation.

The result? Moist soil around the roots at all times — the perfect condition for continuous growth and fruiting.


Why This Watering Method Works Wonders

This technique isn’t just about convenience; it changes how your eggplants grow and produce.

1. Encourages Deep Root Growth

By delivering water directly to the lower soil layers, the roots grow deeper instead of spreading out near the surface. Deep roots make plants more resilient to heat and drought.

2. Reduces Water Waste

Traditional watering methods can waste up to 50% of water due to evaporation and runoff. This method minimizes loss, ensuring every drop reaches where it’s needed most.

3. Prevents Fungal Diseases

Watering from below keeps the foliage dry, significantly reducing the risk of leaf diseases and fungal infections that thrive in wet conditions.

4. Promotes Continuous Fruiting

Consistent moisture and steady nutrition mean the plant never experiences stress. Eggplants can then focus their energy on producing flowers and fruits continuously throughout the year.

5. Improves Soil Health

Deep watering helps beneficial microbes thrive in the soil. These microbes aid in nutrient absorption, making your plants stronger and healthier.


Seasonal Care for Year-Round Harvests

To maintain productivity, combine the watering method with seasonal adjustments:

Spring and Summer

  • Eggplants love warmth. Keep the watering frequency moderate but consistent.
  • Feed plants every two weeks with compost tea or liquid fertilizer.
  • Remove any damaged or diseased leaves to improve airflow.

Fall

  • As temperatures drop, reduce watering slightly.
  • Add extra mulch to retain soil warmth.
  • Prune older stems to encourage new shoots.

Winter (in mild climates or greenhouses)

  • Protect plants from frost by covering them with row covers or moving them into a greenhouse.
  • Water sparingly — just enough to keep soil slightly moist.
  • Lightly prune to remove dead growth and keep the plant compact.

With proper protection and steady care, your eggplants can continue to bear fruit even during the cooler months.


Bonus Tip: Combine with a Fertigation System

To take it one step further, you can use the same watering tube for feeding. Dissolve organic fertilizers (like seaweed extract or compost tea) in water and pour it through the tube.

This fertigation technique delivers nutrients straight to the roots, boosting flowering and fruiting without the risk of over-fertilizing.


Troubleshooting Common Issues

Even with a great watering method, challenges can arise. Here’s how to handle them:

  • Flower Drop: Often caused by inconsistent watering or temperature stress. Make sure soil moisture is even and temperatures remain stable.
  • Small Fruits: Indicate low nutrition — feed with compost tea or organic fertilizer.
  • Pests: Watch out for aphids and flea beetles. Use neem oil or insecticidal soap to manage infestations naturally.
  • Yellow Leaves: Could be due to overwatering — reduce frequency slightly.

Sustainability and Savings

This watering method doesn’t just increase yield — it also saves water, reduces the need for chemical fertilizers, and makes your garden more sustainable. For small-scale farmers and home gardeners alike, it’s an affordable way to achieve commercial-level productivity.

Imagine harvesting baskets of shiny, fresh eggplants month after month, all thanks to a simple DIY watering system that costs almost nothing to set up.


Final Thoughts

The secret to year-round eggplant production isn’t just about the right variety or fertilizer — it’s about mastering water management. By adopting this simple but powerful subsurface watering method, you can maintain healthy soil, strong roots, and continuous fruiting.

Whether you grow eggplants in containers, raised beds, or backyard plots, this technique ensures that your garden stays lush, productive, and sustainable.

So, next time you’re planning your vegetable patch, remember: it’s not how often you water, but how smartly you do it that makes all the difference.

How to Create a Hanging Garden That Grows Lettuce Without Watering

How to Create a Hanging Garden That Grows Lettuce Without Watering

Imagine a lush hanging garden full of crisp, fresh lettuce—thriving without daily watering, soil mess, or constant maintenance. Sounds impossible, right? Well, it’s not! Many innovative gardeners are now growing lettuce in hanging systems that require little to no watering at all, thanks to clever design and modern hydroponic principles.

This new approach combines the beauty of vertical gardening with the efficiency of water-conserving technology. The result is a self-sustaining hanging garden that produces more lettuce in less space and with minimal effort.

In this article, you’ll learn how this system works, what makes it so productive, and how you can build your own hanging lettuce garden at home that thrives even without traditional watering.


The Idea Behind a Water-Free Hanging Garden

Growing lettuce without daily watering may sound magical, but it’s rooted in science. The system works on principles similar to hydroponics or wick irrigation, where plants get their nutrients and moisture directly through controlled water delivery systems.

Instead of drenching soil every day, these hanging gardens use:

  • Water-retaining materials or nutrient films to supply moisture slowly.
  • Self-watering reservoirs that recycle and conserve water.
  • Closed-loop systems that prevent water loss through evaporation.

Essentially, your lettuce plants have access to all the moisture they need—without a drop going to waste.


Why Grow Lettuce in a Hanging Garden?

Lettuce is one of the best vegetables for hanging gardens because it’s lightweight, fast-growing, and thrives in controlled environments. Here are the main benefits of growing it this way:

  1. No Soil Mess: The system uses a soilless medium, keeping your balcony, patio, or indoor area clean.
  2. No Daily Watering: Perfect for busy gardeners or those living in dry climates.
  3. High Productivity: Plants grow faster and produce more due to continuous moisture and nutrients.
  4. Space Efficient: Vertical design saves ground space while maximizing yield.
  5. Pest-Free Gardening: Hanging planters are less accessible to insects and soil-borne pests.
  6. Sustainable and Eco-Friendly: Uses up to 90% less water compared to traditional gardening.

So, if you want a garden that’s low-maintenance, attractive, and super-productive, this is the perfect setup.


Materials You’ll Need

You don’t need expensive equipment to create your own hanging lettuce garden. In fact, most materials can be found at home or at your local garden supply store.

Here’s what you’ll need:

  • Hanging Containers or Bottles: Plastic bottles, hanging baskets, or PVC pipes work well.
  • Growing Medium: Coco coir, perlite, or peat moss (light, water-retaining materials).
  • Nutrient Solution: A hydroponic fertilizer that provides all essential plant nutrients.
  • Wicking Material (optional): Cotton rope, felt strips, or capillary mat for self-watering systems.
  • Reservoir or Water Tank: To hold and recycle the nutrient solution.
  • Air Pump (optional): For oxygenating water if using a hydroponic setup.
  • Seedlings or Seeds: Lettuce varieties like butterhead, romaine, or leaf lettuce.
  • Drill or Cutter: To make holes in containers for drainage and plant placement.
  • Support Hooks or Frame: To hang your garden vertically.

Step-by-Step Guide to Building a Hanging Lettuce Garden

Let’s go through how to build your own system that lets you grow lettuce easily—without constant watering.


Step 1: Choose the Right Location

Lettuce loves cool temperatures and indirect sunlight. Choose a spot that gets about 4–6 hours of filtered light daily—like a balcony, patio, or near a sunny window.

Avoid areas with strong wind or excessive heat, as they can dry out the leaves and growing medium quickly.


Step 2: Prepare the Hanging Containers

You can use recycled plastic bottles, PVC tubes, or hanging pots.

  • Cut a hole near the top for planting and a smaller hole at the bottom for drainage.
  • If using bottles, cut off the top and invert it into the base to create a self-watering design.
  • For aesthetic appeal, you can paint or decorate the containers.

Hang them securely using sturdy rope, wire, or a metal chain. Make sure the setup can hold the combined weight of water, medium, and plants.


Step 3: Add the Growing Medium

Fill each container with your soilless growing medium—like coco coir, vermiculite, or perlite. These materials hold moisture well while allowing good air circulation for the roots.

If you’re building a self-watering system, insert a wick (a cotton rope or fabric strip) from the reservoir below into the growing medium. The wick will draw water upward as the plants need it.


Step 4: Set Up the Water or Nutrient Reservoir

Place a water reservoir (like a plastic tub or bucket) underneath your hanging containers. Connect small tubes or wicks from the reservoir to each hanging planter.

If you’re going hydroponic, fill the reservoir with a nutrient-rich solution and install an air pump to keep the water oxygenated and prevent stagnation.

This ensures your lettuce roots get a steady supply of moisture and nutrients—without manual watering.


Step 5: Plant Your Lettuce

You can either start from seeds or use seedlings.

  • If starting from seeds, sprinkle a few onto the moist growing medium and cover lightly.
  • If using seedlings, gently transplant them into the containers, ensuring the roots are in contact with the moist medium.

Lettuce germinates quickly (within 5–7 days), and you’ll see visible growth in about two weeks.


Step 6: Monitor and Maintain

While this system reduces watering needs drastically, a little monitoring goes a long way:

  • Check water levels in your reservoir every few days and refill as needed.
  • Maintain nutrient strength—change or top up the solution every 2–3 weeks.
  • Ensure good airflow to prevent mold or fungal issues.
  • Harvest regularly—this encourages new leaves to sprout continuously.

With this low-maintenance system, you’ll have an abundant harvest of fresh lettuce without ever worrying about forgetting to water!


How This System Saves Water

The reason this hanging garden doesn’t require daily watering lies in its closed-loop water system.

  • Water that drains from the planters is collected and recirculated.
  • The medium retains just enough moisture for root absorption.
  • Evaporation is minimal due to limited surface exposure.

Compared to traditional soil gardening, this setup can save up to 95% of water—a huge win for eco-friendly and urban gardening.


Why This Method Produces High Yields

Gardeners who’ve tried this system often report higher lettuce yields than in soil gardens. Here’s why:

  1. Consistent Nutrient Supply: Plants never experience drought stress, which promotes continuous growth.
  2. Optimized Oxygen Flow: Roots receive both oxygen and moisture simultaneously.
  3. Less Disease Pressure: No soil-borne pests or fungi means healthier plants.
  4. Controlled Environment: Greenhouse or shaded balcony conditions allow steady temperature and humidity.

As a result, lettuce grows faster, with larger, crisper leaves—and the flavor remains fresh and sweet.


Types of Lettuce Ideal for Hanging Gardens

While most lettuce varieties can grow in hanging systems, some perform exceptionally well due to their compact size and quick growth cycle. Try these:

  • Butterhead Lettuce: Soft, sweet leaves and easy to grow in small spaces.
  • Romaine Lettuce: Upright growth makes it perfect for narrow containers.
  • Loose Leaf Lettuce: Grows quickly and allows repeated harvesting.
  • Oak Leaf Lettuce: Beautiful shape and color for decorative gardens.

Mix different types for a colorful, edible display!


Tips for Success

To ensure your hanging garden thrives, keep these expert tips in mind:

  • Use filtered or rainwater if possible; tap water can contain chlorine that harms plants.
  • Monitor pH levels—lettuce prefers slightly acidic water (pH 6.0–6.5).
  • Avoid direct hot sunlight, which can wilt leaves quickly.
  • Trim outer leaves regularly to promote new growth.
  • Add compost tea occasionally if you prefer organic feeding.

With the right balance of light, nutrients, and moisture, your hanging lettuce garden will flourish with little intervention.


The Future of Urban Gardening

As cities grow and water becomes scarcer, methods like this are reshaping how we think about gardening. Hanging hydroponic systems that conserve water and space are not just convenient—they’re vital for sustainable food production.

This approach lets anyone—whether you have a large backyard or just a balcony—enjoy the joy of fresh harvests all year long.


Final Thoughts

The idea of growing lettuce without watering might sound too good to be true, but with modern hanging garden designs, it’s absolutely possible. Using hydroponic principles, self-watering systems, and smart design, you can enjoy high productivity and zero hassle gardening.

Whether you’re a beginner or a seasoned gardener, this method saves water, reduces effort, and delivers crisp, fresh lettuce right to your plate.

So go ahead—hang a few planters, set up your self-watering system, and start your journey toward sustainable, soil-free gardening. You’ll be amazed at how simple it is to turn your home into a thriving, green oasis.


SEO Keywords:
hanging garden lettuce, grow lettuce without watering, hydroponic hanging system, water-saving garden ideas, high productivity lettuce garden, self-watering planter DIY, urban gardening tips, hydroponic lettuce at home, sustainable gardening, vertical garden vegetables.

How One Farmer Built a DIY Aquarium and Greenhouse to Grow Aquatic Vegetables at Home

How One Farmer Built a DIY Aquarium and Greenhouse to Grow Aquatic Vegetables at Home

In recent years, innovative farmers and gardeners have been finding creative ways to grow food sustainably—even in limited spaces. Among these inventive methods, combining aquariums with greenhouses has become an exciting approach to producing healthy, organic, and water-efficient crops.

This technique allows you to grow aquatic vegetables—like water spinach, lettuce, and even some herbs—by using fish waste as a natural fertilizer. The system is clean, eco-friendly, and surprisingly simple to set up at home.

In this article, we’ll explore how a farmer successfully built a DIY aquarium and greenhouse system to grow aquatic vegetables. You’ll learn how it works, the materials you’ll need, and how you can build your own system to enjoy fresh, homegrown produce year-round.


The Concept: Merging an Aquarium with a Greenhouse

The combination of an aquarium and a greenhouse is known as aquaponics—a sustainable farming method that connects fish and plants in a closed, balanced ecosystem.

Here’s how it works:

  • The fish produce waste (mainly ammonia), which is broken down by beneficial bacteria into nitrates.
  • These nitrates become nutrients for plants growing in water beds or hydroponic channels above the aquarium.
  • The plants filter and clean the water naturally, which is then recirculated back to the fish tank.

It’s a self-sustaining system—fish and plants support each other, and you save both water and fertilizer in the process.


Why Build a DIY Aquarium-Greenhouse System?

Building your own aquaponic system has several benefits. Whether you’re a home gardener, a farmer looking to diversify, or someone passionate about sustainable living, this setup offers major advantages:

  1. Year-Round Production:
    The greenhouse protects plants from harsh weather, allowing for continuous growing regardless of season.
  2. Zero Waste:
    Fish waste feeds the plants, and the plants purify the water for the fish—creating a closed-loop cycle.
  3. No Chemicals or Soil Needed:
    Aquatic vegetables grow in water, not soil, so you avoid pests, weeds, and chemical fertilizers.
  4. High Yield in Small Space:
    Perfect for urban farming or backyard setups with limited space.
  5. Low Maintenance:
    Once established, the system needs only regular feeding for the fish and occasional cleaning.

What You’ll Need to Build a DIY Aquarium and Greenhouse System

You don’t need expensive equipment to start your aquaponic garden. With some creativity and basic materials, you can build one using affordable or recycled components.

Here’s a list of essential materials:

  • Aquarium or Fish Tank: Large enough to hold your desired fish population (100–200 liters is great for beginners).
  • Greenhouse Frame or Cover: Can be made from PVC pipes, wood, or metal, and covered with clear plastic sheeting.
  • Water Pump: To circulate water between the aquarium and the plant bed.
  • Growing Bed or Trough: For planting aquatic vegetables (can be plastic containers, shallow tubs, or grow trays).
  • Filter System: Simple mechanical or biofilter to remove solid waste.
  • Aquaponic Media: Like clay pebbles, gravel, or sponge to support plant roots.
  • Aquatic Plants or Seeds: Water spinach (kangkong), lettuce, basil, and mint are great starters.
  • Fish: Tilapia, goldfish, or catfish work well—they’re hardy and adapt easily.
  • PVC Pipes or Tubing: For water flow between the fish tank and grow bed.
  • Air Pump: To oxygenate the water and keep fish healthy.
  • pH Testing Kit: To ensure the water stays balanced for both fish and plants.

Step-by-Step: How to Build Your Aquarium-Greenhouse System

Let’s walk through how the farmer built his setup from scratch. This same process can be adapted for your backyard or balcony garden.


Step 1: Build the Greenhouse Structure

Start by constructing a simple greenhouse frame using lightweight PVC pipes or wood. Cover it with clear plastic sheets or polycarbonate panels to trap sunlight and protect your system from wind and rain.

Make sure the greenhouse allows enough airflow—you can install small vents or mesh windows to prevent overheating.


Step 2: Set Up the Aquarium or Fish Tank

Choose a sturdy aquarium or tank and place it on a flat, stable surface inside the greenhouse. If possible, elevate the grow bed above the aquarium to allow gravity-fed water circulation.

Add dechlorinated water, then introduce your fish once the system stabilizes. Start with a few hardy species like tilapia or goldfish—they’re great for beginners and produce enough waste to feed your plants.


Step 3: Install the Water Pump and Pipes

The water pump will move nutrient-rich water from the fish tank to your grow bed.

  • Connect PVC pipes or hoses to the pump’s outlet and lead it into your plant container.
  • Drill small drainage holes in the plant bed so the water can flow back into the aquarium.
  • Use gravity to your advantage—position the grow bed slightly higher than the fish tank.

This circulation ensures plants receive nutrients while maintaining clean, oxygenated water for the fish.


Step 4: Prepare the Grow Bed

Fill your grow bed or trough with a growing medium such as gravel, clay pellets, or sponge foam. This provides support for plant roots and acts as a biofilter, helping beneficial bacteria thrive.

Plant your aquatic vegetables directly into the bed, ensuring roots are submerged but not fully drowned. You can use seedlings for faster results.


Step 5: Introduce the Plants and Fish

Once your system is circulating water properly, add the fish to your aquarium and the plants to your grow bed.

Feed your fish regularly with commercial fish feed or natural food like worms and kitchen vegetable scraps. The waste they produce will break down into nutrients for your plants.

Monitor the water’s pH (6.5–7.0) and ammonia levels weekly to keep everything balanced.


Step 6: Maintain the System

The beauty of this system is that it requires very little upkeep:

  • Feed the fish daily.
  • Check the water pump and air pump weekly.
  • Remove any dead leaves or plant debris.
  • Test the water’s pH and temperature periodically.
  • Add water to the tank to replace evaporation losses.

That’s it! The system takes care of itself, with fish and plants working in harmony.


What Aquatic Vegetables Can You Grow?

The farmer demonstrated that many aquatic or semi-aquatic plants thrive beautifully in this type of system. Some of the best choices include:

  1. Water Spinach (Kangkong): A fast-growing leafy vegetable that loves nutrient-rich water.
  2. Lettuce: Grows well in hydroponic-style aquaponic setups.
  3. Watercress: Perfect for wet environments and rich in vitamins.
  4. Mint and Basil: Thrive in moist media and absorb nutrients efficiently.
  5. Chinese Celery: Popular in Asian cuisine, grows easily in shallow water.

If you’re adventurous, you can even experiment with aquatic flowers like lotus or water lilies, although these are mostly ornamental.


Benefits of Combining Fish and Plants

This smart method offers benefits beyond just fresh vegetables. It’s an incredible example of natural symbiosis, where every element has a purpose:

  • Fish waste → food for plants
  • Plants → natural filter for fish water
  • Microbes → convert ammonia into nutrients

This cycle reduces waste, saves water, and produces organic, pesticide-free food. It’s a sustainable system that works beautifully both at a small and large scale.


Tips for a Successful DIY Aquarium-Greenhouse Setup

  1. Start Small: Begin with a few fish and a small grow bed to learn the basics before expanding.
  2. Balance Is Key: Don’t overcrowd the fish tank. More fish means more waste, but too much can harm water quality.
  3. Ensure Proper Lighting: Aquatic vegetables need at least 6–8 hours of sunlight daily, or use LED grow lights indoors.
  4. Monitor Water Quality: Test ammonia, nitrate, and pH levels regularly.
  5. Harvest Gradually: Trim or harvest leaves regularly to encourage continuous growth.

Why This DIY System Is Perfect for the Future

With growing concerns about food security, water scarcity, and climate change, systems like this are becoming essential. They make it possible for families and small farmers to produce food sustainably, without relying on expensive fertilizers or large farmland.

The farmer’s creative use of a DIY aquarium and greenhouse proves that innovation and sustainability can go hand in hand. It’s a low-cost, high-reward method anyone can replicate at home—with a little effort and a lot of curiosity.


Final Thoughts

Building a DIY aquarium-greenhouse system to grow aquatic vegetables isn’t just an exciting project—it’s a step toward sustainable living. By learning from resourceful farmers, we can grow fresh, organic food while conserving water and energy.

Whether you’re a hobby gardener or a serious grower, this system offers endless possibilities. You can produce your own food, teach kids about ecosystems, and contribute to a greener planet—all from your backyard or balcony.

So why not start today? Gather your materials, follow these steps, and watch your aquatic garden flourish. You’ll be amazed at how fish, plants, and nature work together in perfect harmony.


SEO Keywords:
DIY aquarium greenhouse, grow aquatic vegetables, aquaponics system at home, sustainable farming, hydroponic vegetables, fish tank gardening, home aquaponic setup, grow water spinach, eco-friendly gardening, self-sustaining greenhouse.

How to Make a Simple Hydroponic System at Home

How to Make a Simple Hydroponic System at Home

Have you ever wished you could grow your own vegetables year-round without worrying about soil, weeds, or messy gardening tools? The good news is—you can! With a simple DIY hydroponic system, you can grow fresh, healthy greens, herbs, and vegetables right in your kitchen, balcony, or backyard.

Hydroponics is a modern, soil-free gardening method that’s gaining popularity worldwide. It uses a nutrient-rich water solution to feed plants directly, resulting in faster growth and higher yields. The best part? You don’t need to be a scientist or a professional gardener to start—just a few basic materials and a bit of enthusiasm.

In this step-by-step guide, you’ll learn how to make a hydroponic system at home, what materials you need, how it works, and how to grow your favorite crops efficiently and sustainably.


What Is a Hydroponic System?

Hydroponics is a method of growing plants without soil, where roots are suspended in water that’s enriched with essential nutrients. The plants receive everything they need directly through this nutrient solution—water, oxygen, and minerals—resulting in faster, cleaner, and more efficient growth.

Instead of depending on the soil for nutrients, hydroponic systems allow you to control everything—from pH levels to nutrient strength—giving you perfect conditions for your plants all year long.


Why Choose Hydroponics at Home?

Before we dive into the building process, let’s understand why so many home gardeners are switching to hydroponics:

  1. No Soil Needed: Say goodbye to dirt, pests, and weeds.
  2. Faster Growth: Plants grow up to 50% faster than in traditional soil.
  3. Saves Water: Hydroponics uses up to 90% less water than soil gardening.
  4. Space Efficient: Perfect for apartments, balconies, or small homes.
  5. Year-Round Gardening: You can grow your favorite vegetables regardless of season.
  6. Cleaner and Healthier Produce: No soil means no chemicals, pesticides, or mud.

Hydroponics is not only fun—it’s a sustainable way to grow your own food right where you live.


Materials You’ll Need to Build a Home Hydroponic System

The great thing about hydroponics is that it doesn’t require expensive tools. You can easily build a simple setup using household items or materials from a hardware store.

Here’s what you’ll need:

  • Container or Reservoir: A plastic tub, storage bin, or bucket to hold the water and nutrients.
  • Net Pots or Plastic Cups: Small containers to hold your plants.
  • Growing Medium: Such as coco coir, perlite, or rockwool to support the plant roots.
  • Air Pump with Air Stone: (Like those used in aquariums) to provide oxygen to the roots.
  • Hydroponic Nutrient Solution: A liquid fertilizer formulated specifically for hydroponic systems.
  • Seedlings or Seeds: Choose easy-to-grow crops like lettuce, spinach, basil, or tomatoes.
  • pH Testing Kit: To monitor and balance the nutrient solution.
  • Drill or Cutter: To make holes in your lid or container.

Optional:

  • Grow Lights: If you’re growing indoors or don’t get enough sunlight.
  • Timer: To automate lighting or watering cycles.

Step-by-Step: How to Make a Simple Hydroponic System at Home

Let’s build your hydroponic system step by step. We’ll use the Deep Water Culture (DWC) method—one of the easiest and most popular hydroponic setups for beginners.


1. Prepare the Container or Reservoir

Choose a large plastic container with a lid—something between 10–20 liters in capacity. This will serve as your main water and nutrient reservoir.

  • Clean the container thoroughly.
  • Cut or drill holes in the lid big enough to fit your net pots or plastic cups.
  • Space them evenly so each plant has enough room to grow.

Pro Tip: Use dark-colored containers or paint the outside black to prevent algae growth (since algae thrive in light).


2. Add the Air Pump and Air Stone

Place your air stone inside the reservoir at the bottom. Connect it to the air pump using a rubber tube and place the pump outside the container (so it stays dry).

The air pump ensures your plants’ roots get enough oxygen—without it, roots can suffocate in stagnant water.


3. Mix the Nutrient Solution

Fill the container about three-quarters full with clean, room-temperature water. Then, add the hydroponic nutrients as directed on the packaging.

Hydroponic fertilizers contain all essential macro- and micronutrients like nitrogen (N), phosphorus (P), potassium (K), calcium, and magnesium.

Once mixed, check the pH level of the solution—it should be between 5.5 and 6.5 for most plants. Adjust it if needed using pH up/down solutions (available at gardening stores).


4. Prepare the Plants

If you’re starting from seeds, germinate them first in a damp paper towel or small seedling tray until they sprout tiny roots.

If you already have seedlings, rinse off any soil from the roots before placing them in your growing medium (such as coco coir or perlite).

Gently place your seedlings into the net pots or plastic cups, ensuring the roots extend slightly out of the bottom. The goal is for the roots to reach into the nutrient solution once placed in the lid holes.


5. Assemble the System

Now, place the lid with the plants on top of your nutrient-filled container.

Make sure the roots are touching the water lightly—this ensures they’ll start absorbing nutrients and oxygen immediately.

Turn on your air pump to begin the oxygenation process. You should see small bubbles forming in the water, which means oxygen is circulating effectively.


6. Provide Light

Plants need light to perform photosynthesis and grow strong.

  • If growing indoors, use LED grow lights and position them about 12–18 inches above the plants.
  • If outdoors, make sure your setup gets at least 6 hours of direct sunlight daily.

Maintain a light schedule of 14–16 hours per day for best growth.


How the Hydroponic System Works

Here’s the beauty of hydroponics: once set up, it’s mostly self-sustaining.

The air pump oxygenates the water, preventing the roots from drowning. The roots absorb nutrients directly from the water, allowing the plant to grow quickly without expending energy searching for food in soil.

Because everything the plant needs—light, air, water, and nutrients—is perfectly balanced, it grows faster, healthier, and more efficiently.


Maintenance Tips for Your Home Hydroponic System

While hydroponic gardening is low-maintenance, a few simple habits will keep your system running smoothly:

  1. Check Water Levels: Refill your reservoir as water evaporates.
  2. Change Nutrient Solution: Replace every 2–3 weeks to prevent salt buildup.
  3. Monitor pH: Keep it between 5.5 and 6.5 for optimal nutrient absorption.
  4. Clean System Monthly: Rinse with mild hydrogen peroxide or vinegar solution to prevent algae or bacteria.
  5. Inspect Roots: Healthy roots are white and firm. Brown or slimy roots indicate a problem with oxygenation or nutrients.

By following these steps, your plants will thrive all season long.


Best Plants to Grow in a Home Hydroponic System

Not all plants are equally suited to hydroponics, but many common vegetables and herbs grow beautifully. Here are some great choices for beginners:

  • Lettuce and leafy greens (spinach, kale, Swiss chard)
  • Herbs (basil, mint, cilantro, parsley, oregano)
  • Tomatoes and cherry tomatoes
  • Cucumbers
  • Strawberries
  • Peppers

Start with fast-growing greens and herbs before experimenting with larger fruiting plants.


Advantages of Making a Hydroponic System at Home

Building your own hydroponic setup offers incredible benefits:

  • Fresh food all year round: Enjoy homegrown vegetables even in winter.
  • Saves space: Grow vertically or on small balconies.
  • Water efficient: Perfect for regions with limited water supply.
  • No weeding or tilling: Maintenance is simple and clean.
  • Eco-friendly: Reduces carbon footprint and eliminates chemical pesticides.

Plus, it’s an exciting and educational project for both kids and adults—an easy way to learn about plant science, sustainability, and self-sufficiency.


Common Problems and How to Fix Them

Here are a few common beginner issues and quick solutions:

  1. Yellowing leaves: Usually a sign of nutrient deficiency—add more fertilizer or check pH.
  2. Slimy roots: Caused by lack of oxygen or algae—clean the system and improve aeration.
  3. Slow growth: Ensure your plants are getting enough light and that nutrient concentration isn’t too weak.
  4. Algae growth: Use opaque containers or cover exposed water to block sunlight.

Final Thoughts: Your Hydroponic Garden Starts Now

Making a hydroponic system at home is one of the smartest and most rewarding ways to grow your own food. With a few affordable materials and simple setup, you can enjoy pesticide-free, nutrient-rich vegetables and herbs right from your kitchen or balcony.

It’s clean, sustainable, and surprisingly easy to maintain—even if you’re new to gardening. So why wait? Gather your supplies, follow these steps, and start your hydroponic journey today. You’ll be amazed at how fast your plants grow—and how delicious your homegrown produce tastes!


SEO Keywords:
how to make hydroponic system at home, DIY hydroponics setup, home hydroponics guide, hydroponic gardening for beginners, grow vegetables without soil, indoor hydroponic system, hydroponic nutrient solution, hydroponic plants, sustainable gardening, hydroponics at home.